API keys and MCP
Create a Helipod API key, connect an AI assistant over MCP, and use Heli Crew in the dashboard.
This guide shows where to create API keys in the dashboard, how to connect an AI assistant such as Claude or ChatGPT to your account, and how to use Heli Crew, the assistant built into the dashboard. For how to send a key and what each scope allows, see API keys.
Create an API key
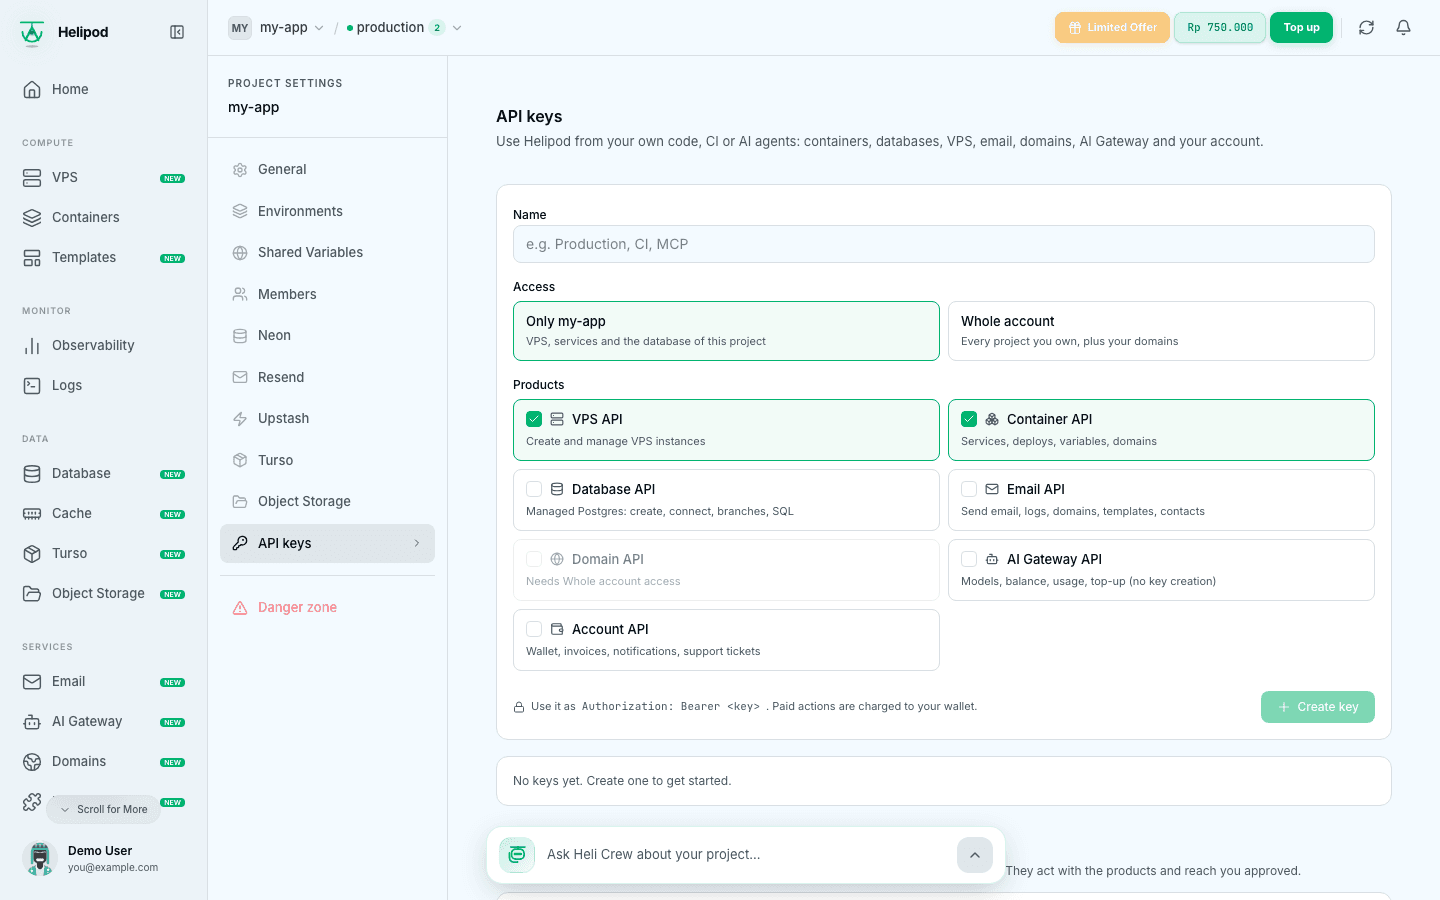
Name the key
Give it a name that says where it is used, for example Production, CI or MCP.
Choose the access
- Only this project (shown with your project name): the key reaches the VPS, services and database of this project only.
- Whole account: every project you own, plus your domains, wallet and AI balance.
Choose the products
Tick the APIs the key may use: VPS API, Container API, Database API, Email API, Domain API, AI Gateway API and Account API. VPS API and Container API are ticked to start with. Domain API needs Whole account, because domains belong to your account rather than to a project.
Create and copy the key
Click Create key. The key starts with hel_ and is shown only once: copy it to a password manager or CI secret right away. If you lose it, revoke it and create a new one.
Your keys are listed below the form with their access and products. Click the revoke button and confirm Revoke key to stop a key. Requests that use it start failing immediately.
Treat a key like a password. Tick AI Gateway API and Account API only on keys that need them, because they reach your balance, invoices and support tickets.
Connect an AI assistant with MCP
AI tools that support MCP (Claude, ChatGPT, Claude Code, Codex, Cursor and others) can manage Helipod for you. You do not need to copy an API key: the tool signs in to your account.
Add the Helipod server
In your AI tool, add this MCP server address:
https://api.helipod.io/mcpEach tool has its own menu for this. See AI agents for step by step setup per tool.
Sign in and approve
The tool opens a Helipod page in your browser. Sign in with Google, then choose what the tool may reach: Whole account or One project, and which products under Products. Click Allow.
Check Connected apps
Back in Settings → API keys, the Connected apps section lists every AI tool that signed in, what it can reach and when it was last used. Click Disconnect to take its access away right away. It has to sign in again to come back.
Heli Crew in the dashboard
Heli Crew is an assistant inside the dashboard. It works with the same tools as MCP, so you can ask questions and make changes in plain language.
- Open it: click the Ask Heli Crew about your project… bar at the bottom of a project page, or press Ctrl J (Windows, Linux) or ⌘ J (Mac). Press Esc to close it.
- Context: it uses the page you are on as context (shown as Viewing). Click Whole account to ask about everything instead.
- Commands: type
/to see shortcuts such as/logs,/deploy,/costs,/vps,/domains,/model(choose the AI model) and/clear. - Reading is direct, changes need your approval: Heli Crew reads logs, lists and costs straight away. Before anything that changes your project or costs money (a deploy, a restart, a purchase), it shows the request and waits until you click Approve or Deny.
Heli Crew is paid from your AI balance, not your wallet. The model picker shows a rough cost per question. If the AI balance is empty, click Top up AI balance. Heli Crew in the dashboard is available to the project owner only; members can still connect their own AI tool over MCP.